Horse Record Book Resources
- Senior Horse Record Book* - for use by Seniors beginning the 2021-22 year and beyond
- Old Florida Horse Record Book (for INT and JR to use)
The new (in 2021) Horse Record Book is for Senior 4-H'ers. Juniors and Intermediate may use the existing book again this year. Some counties have customized versions of the State's Horse Record book, and they may customize the '21 Senior book as desired for their program.
*Anyone who plans to apply for either of the Horse Scholarships (Horseman of the Year and Dallas C. Osborne) will be expected to use and submit the new Senior Horse Record Book with their application.
-
Horse Program Information, Forms, Rules
4-H Horse Program Informational Flyer
Project Horse Certification Form
Before using the form on this link, check with your Leader or 4-H Agent to see if there is a customized form to be used in your county. This is not an "Official State Form" that must be used. Counties may use their own custom versions to incorporate other rules, info, etc. that are unique to their programs. This form should be used only if a county does not use a customized one.
-
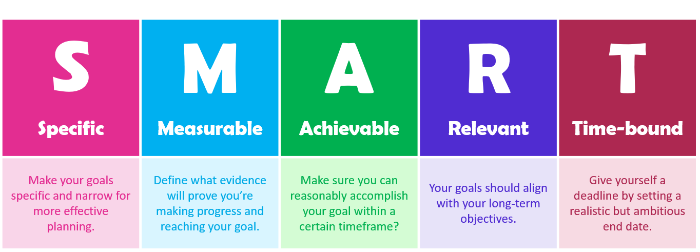
Setting SMART Goals

Go to the Florida 4-H SMART Goals Worksheet
-
How to Measure Height
Measuring a Horse’s Height
Horses are measured in “Hands,” and one hand equals 4 inches. Horse/pony heights are typically written in the format of “14.2 hands,” where “14” is the number of hands and “2” means 2 additional inches above 14 hands. Therefore 14.2 hands = 58 inches (14x4 + 2 = 58).
How to Measure
- Stand your horse on a surface that is level and solid to prevent the horse or stick from sinking into the ground. If level concrete or asphalt is not available, you may have to stand the horse on something such as a piece of plywood.
- Make every effort to keep the animal relaxed. The head should be in a normal position (never lower than horizontal) and the horse stood up "square".
- Horses should be measured at the highest point of the withers. Refer to the diagram and pictures on this PDF to help determine the proper place to take a measurement.
- Use a horse measuring stick designed for this purpose. Make sure the stick to the ground is vertical, and that the arm going to the horse’s withers is horizontal. Seat the arm firmly on the highest point of the withers, but do not press down or apply additional pressure. When everything is level and properly placed, take the height reading.
- If you do not have a horse measuring stick, try asking your leader, trainer, or friend at a riding stable to borrow one. If you are not able to find one, you may use measuring tape, something with a >12” solid straight edge like a ruler, and levels. Make sure that the tape is pulled tight from the ground to even with the horse’s withers, then use the ruler as the “arm” to reach over to the horse. Use levels to make sure both parts are straight vertically and horizontally, then take the reading in inches where the ruler crosses the tape. This method will have more room for error and would not be accepted as an “official” measurement, but it should be close enough to give you an idea of your horse’s height.
- If the animal has shoes and/or pads on, the thickness of these may be subtracted from the measured height.
-
How to Measure/Calculate Weight
Estimating a Horse's Weight
- Using a weight tape
The easiest, but not necessarily the most accurate, method of estimating a horse's weight is using a heart girth weight tape. They are inexpensive and available at most feed stores -- sometimes even free. Wrap the tape snugly around the horse's heart girth, and where the end overlaps the tape is the weight estimation. This method is often off by +/- 100 pounds, but it should at least give you a rough idea of the weight. - Using a measuring tape
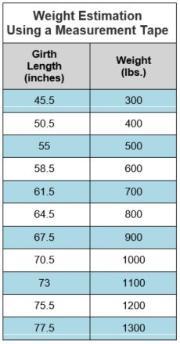
If you do not have access to a weight tape, you can use a regular measuring tape. Wrap it around the heart girth using the same method as above to determine the length in inches. Use the table to the right to determine the weight from the heart girth length (extrapolating for measurements in between what's given). - Using multiple measurements and a calculation
The first two methods use only one measurement. Measuring the length of the horse and using that in a formula with the heart girth measurement provides a little more accuracy. Using a regular measuring tape, measure the heart girth (in inches) as above, and also measure the length from the point of the shoulder to the point of the buttock. Use those lengths in the following formula:
Estimated weight (lbs) = (Heart girth x Heart girth x body length)
330 - Using a scale
Of course, the most accurate method to measure a horse's weight is a scale, but not many have access to one for horses. If you do have a way to use a horse scale, it's an interesting exercise to estimate the horse's weight using the above methods and compare the results to the actual measured weight.
- Using a weight tape
-
Body Condition Scoring
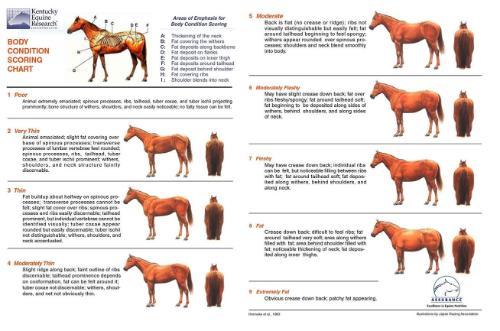
The Body Condition Score (BCS) system was developed by Dr. Henneke as a tool to estimate the nutritional status of horses. It is used universally across breeds and does not require the use of special equipment. Each evaluated individual is assigned a number from 1 to 9 based on the amount of fat cover they carry in key areas. An overall BCS of 4-6 is considered ideal; horses that score under 4 are underweight while horses scoring over 6 would be considered overweight.
Go to this page for more explanations and examples of body condition scoring, as well as managing your horse's weight.
-
Measuring Temperature, Pulse, and Respiration (TPR)
Temperature, Pulse and Respiration (TPR)
Temperature, pulse, and respiration (TPR) are the basic parameters every horse owner or care provider should know how to monitor. Knowing your horse's normal values for these vital signs can provide great insight about your horse’s physiological state. And knowing what is baseline for your horse will help you recognize that there may be a problem when one of the values is abnormal.
The normal measurements given below represent an average adult horse at rest:
- Temperature - The normal rectal temperature of an adult horse is 99.5 to 101.5°F (37.5 to 38.6ºC).
- Pulse (heart rate) - Although the normal heart rate for most horses is 32 to 36 beats per minute (bpm), some may have down to 24 bpm, or up to 40 bpm.
- Respiration rate - The normal respiratory rate is 8-12 breaths per minute.
Please keep in mind that exercise and/or Florida's heat and humidity can temporarily elevate any of these readings. But they should return to normal after a short time when the horse is rested and/or cooled off.
This document is great further reading on vital signs in horses.
-
Tack, Equipment, Supplies
The Tack, Equipment, and Supplies section helps you realize the value of all of the things you use to maintain, ride, and show your horse. The "real market value" of all of your supplies represents how much it would cost if you bought everything in its current condition at the start of the project (beginning value), and the money you potentially could have if you were to sell everything at the end (ending value). Let's break down the four things being asked.
Items to list
Try to find a happy medium between listing too few things to get a clear idea of your tack & equipment and listing way too many things down to almost "built-in" details. As the instructions say, there is no need to list the barn and the permanent and semi-permanent items used to house and maintain the horses. Yes, these things have significant value, but they are beyond the scope of what needs to be tracked for a 4-H project. These are some examples of what does not need to be listed:
- Barn, fencing, hoses, feed & hay racks (barn or field), sheds (feed/equipment storage), feed barrels, pasture mowers, truck/trailer for hauling to shows, and similar semi-permanent items that can be considered more as part of the facility, and not necessarily just for your project horse.
When deciding what to include, think more on the level of things that you use for daily care, riding, and showing – things that you might not have if not for your project horse(s) and/or traveling with your project horse(s). This could include things such as:
- Grooming equipment, horseware (blankets, boots, etc.)
- Health/first aid products, both reusable (wraps) and consumable (topical medications, fly spray, hoof products, etc.)
- All tack, for both home and show use
- Show outfits, including boots, hats, and helmets
- Working riding gear, such as paddock boots, half chaps, etc. (but not barn chore clothes)
- Gear that you bring 'on the road' that you wouldn't necessarily have if you only kept your horse at home (or at the boarding stable). This could include travel hay nets, buckets, fans, etc.
Please keep in mind that you are not being judged or evaluated on how many or how few things you own or list. The purpose of the chart is merely to generate an accurate reflection of all the supplies you have available to maintain and show your horse, and the investment it represents.
Already Owned or Newly Purchased
Simply put, did you own the item at the beginning of the 4-H year? Or did you buy it sometime during the year?
You likely already owned most of the tack & equipment you use, so those things should be listed as "owned" with a beginning value assigned as described in the next section.
Many of the things bought during the year are consumables, such as fly spray, wound treatments, etc. Using fly spray as an example (as shown in the chart example), you may buy 3 bottles of concentrate over the course of the 4-H year. Those do not have to be listed separately. Just keep notes of things that are bought, and their purchase price, and list them as a group.
Other "one and done" items can be listed individually, like a new show shirt, farm halter & lead rope, etc.
Beginning Value
For the items you already owned, the instructions say to indicate the value you would have to pay if you purchased each item at the beginning (in its current condition). The key is "in its current condition." With that in mind, we are not looking for the purchase price of things that were bought years ago. This is just asking what the cost of that item might be if you were to buy that exact multi-year-old item now. If this is your second or more year in this Horse project, it is logical to use the "Ending" value of an item from last year as the "Beginning" value of this year.
For purchased items, the beginning value is simply what you paid for the items.
Ending Value
Similar to Beginning Value is what you would have to pay if you purchased each item at the beginning (in its current condition), Ending Value is what it is worth at the end of the year in its current condition. Most things depreciate over time and usually do not have the same worth as they did a year ago. A common depreciation of 10% is often used in 4-H projects to learn to recognize the concept. However, not all things depreciate at the same rate. And some items do not depreciate at the same rate over the length of their "life".
For example, almost all tack might experience more than 10% depreciation between when it is purchased new and the end of its first year (like when a new car rolls off the lot, it will instantly become "used" and never be worth as much). However, high-quality, well-made tack might retain that "used" worth for many years without losing much more value. If you buy a $800 Ranch saddle new, you might be lucky to sell it for $600 after a year. However, if it's made by a quality saddle maker and you maintain it well, that same saddle might still be worth $500 or more for many years. Even after 10+ years, it may still be worth ~$500 if it's by a reputable, in-demand maker.
Similarly, many pieces of tack flatten out at a "bottom" value. A non-descript saddle for practice or trail riding might be worth $100 whether it's 15 or 25 years old (assuming in working order). And plain nylon fun bridles might be a minimal $5 for years between when they've depreciated from being "nice" and when they finally fall apart.
On the other hand, clothes typically depreciate much faster. A $150 hunt coat might drop to less than $100 after its first year, then to $50 or less after a few years. Good riding boots drop significant value after they've been worn (and broken in), but may level out at a median "used" value for many years before depreciating more towards the end of their useful life.
Consumable supplies would have their ending values determined differently from the "what you could sell it for" approach. If you bought a $15 jar of wound-care ointment and only used it for a few days to treat a cut, you likely still have most of that jar full of product. You're probably not going to be able to sell an open jar, but that does not mean the ending value is $0. At the end of the year, there might still be $12 of product still in the jar, so $12 is a reasonable ending value.
The bottom line, it is OK to use a standard 10% depreciation to acknowledge that depreciation exists. However, you can also think about how much or little each item in your inventory changes value over the year and increase or decrease the depreciation accordingly.
-
How to Weigh Feed and Hay
Check out this informational video from the Kentucky Equine Research group: How to Weigh Your Horse's Feed


